Picture this: sunlight slanting through your kitchen window, tiny green shoots poking bravely from little pots — all because you tried growing tomatoes from seeds, right on your countertop.
If you’ve ever picked a tasteless tomato at the store, you know the nagging frustration — all that money for something bland and, honestly, forgettable. Turns out, growing tasty tomatoes isn’t just about saving cash. It’s about reclaiming control, flavor, and pride in what hits your salad bowl.
By the end of this guide, you’ll know exactly how to grow tomatoes from seeds indoors, from that first sparkle of green leaf to your tomatoes’ first day outdoors. Trust me, you’ll want to dive right into the seed tray before you finish your coffee.
Choosing The Right Tomato Seeds For Your Climate
Feeling overwhelmed by all the tomato seed options? You’re not alone — hundreds of varieties line the shelves, and choosing the wrong one can mean weak harvests or stubborn plants that never thrive in your garden. So, what’s really the best tomato seed for your climate?
Here’s the thing: tomato varieties fall broadly into three categories — determinate, indeterminate, and dwarf. But that’s just step one. The real key? Matching the genetic strengths of each type to your unique growing zone, sunlight hours, and temperature swings. The U.S. Department of Agriculture Plant Hardiness Zone Map is the official reference for gardeners nationwide — always start there to identify your zone before you shop.
💡 Pro Tip: For short, unpredictable summers, choose quick-maturing varieties (like ‘Early Girl’ or ‘Siberian’) that are bred for speedy harvests. The National Gardening Association recommends these for zones with fewer than 100 frost-free days.
Popular Tomato Types: What Works Where?
| Seed Type | Best Climate | Recommended Varieties |
|---|---|---|
| Cherry | Variable – thrives in cooler or hotter regions | ‘Supersweet 100’, ‘Sun Gold’ |
| Beefsteak | Warm, long-season climates | ‘Brandywine’, ‘Big Rainbow’ |
| Paste (Roma) | Moderate, dry summers | ‘San Marzano’, ‘Roma VF’ |
Picture this scenario: you grab a packet of ‘Brandywine’ seeds — famous for taste — and set them under your grow light, only to realize midsummer that your region’s cool nights stunt their growth. A gardener in zone 4, for example, will do better with ‘Siberian’ or ‘Glacier’ than any large beefsteak. Meanwhile, those in southern states with humid, disease-prone summers should look for varieties labeled as VFN-resistant — that means they’re bred for resistance to Verticillium, Fusarium, and Nematodes.
- Disease Resistance: Look for codes like V, F, N on seed packs for extra protection.
- Days to Maturity: Early types (under 70 days) are safest in short-summer regions.
- Heirloom vs Hybrid: Heirlooms pack flavor and seed-saving potential; hybrids tend to offer resilience and bigger yields.
And honestly? Most beginners ignore the climate info on the back of the packet — which is a shame, since major seed suppliers (like Burpee and Johnny’s Selected Seeds) rely on decades of trial data from Cooperative Extension Services and the USDA. Never hesitate to contact your local Extension office with questions about regional favorites or climate hurdles.
What actually works might surprise you…
Best Soil And Containers For Indoor Seed Starting
Which soil mix actually gives your tomato seedlings a fighting chance? And what kind of container keeps roots healthy instead of stunted? Most indoor gardeners struggle here — but a little knowledge goes a long way.
The truth is, the right container and medium do half the work for you. Cheap plastic trays from the dollar store rarely have enough drainage, leading to waterlogged roots (or worse, fungal gnats). Instead, look for biodegradable pots or modular cell trays designed for airflow. The real magic, though, is in the soil: skip generic “garden dirt” and use a sterile seed starting mix with peat or coconut coir, perlite, and a sprinkle of fine vermiculite for moisture balance. The USDA and experts at The University of California’s Master Gardener Program agree — sterility is critical for preventing “damping off” disease.
| Container Type | Main Benefit | Ideal For |
|---|---|---|
| Cell Trays | Promote individual root growth, easy transplant | Large batches |
| Biodegradable Pots | Reduce transplant shock, eco-friendly | Direct-to-soil planting |
| Repurposed Yogurt Cups | Cost-effective, customizable | Small-scale starters |
⚠️ Important Warning: Never reuse last year’s soil for seedlings. Pathogens and fungal spores linger, and new seeds are incredibly vulnerable in their first days.
- Seed Starting Mix: Buy pre-mixed or make your own using equal parts coir or peat, perlite, and vermiculite.
- Container Hygiene: Wash with hot soapy water and rinse with a mild bleach solution (1:9 ratio) if reusing plastic pots.
- Depth: Aim for containers at least 2–3 inches deep. Shallow trays dry out too fast.
In practice: imagine sowing your tomato seeds into a homemade mix in clean, recycled yogurt cups. Those tiny sprouts shoot up strong — while your neighbor’s seedlings, started in cheap, heavy soil, wilt and yellow within a week. That’s the power of good choices up front.
But there’s one detail most owners completely overlook until it’s too late…
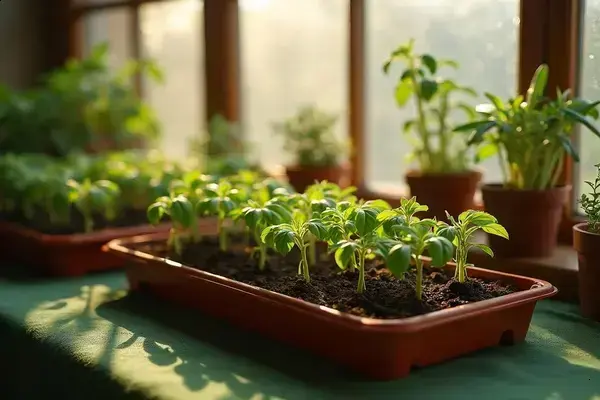
Step-By-Step Guide To Sowing And Caring For Seedlings
Ever wonder why some people get strong, bushy tomato seedlings while others end up with spindly, sad stems? The right sowing steps make all the difference. Trust me, if you follow a proven process, you’ll transform those seeds into sturdy little plants ready for the garden when the time comes.
- What you’ll need: high-quality tomato seeds, sterile seed starting mix, clean containers or cell trays, misting bottle, plastic dome or clear wrap, and a heat mat (optional).
- Moisten Your Soil: Before sowing, dampen the seed starting mix so it’s evenly moist but not soggy. This helps seeds stick in place and keeps early roots safe.
- Fill and Settle Trays: Fill containers with the mix, tapping gently to remove air pockets—don’t pack it down hard, or roots will struggle.
- Sow Seeds Thinly: Place seeds about 1/4 inch deep. Space them evenly, two seeds per cell for reliability. Cover lightly with more mix.
- Mist, Don’t Soak: Use a spray bottle to gently mist the surface. Avoid heavy watering that can disturb or rot seeds at this stage.
- Cover and Warm: Add a clear lid or plastic wrap to create humidity. Place trays in a warm area—around 75°F (or use a seedling heat mat for consistent results).
- Watch for Sprouts: Seeds usually sprout in 5-10 days. As soon as you see green, remove covers to let in air, and move trays under strong, indirect light or fluorescent grow lights.
- Thin and Water Smart: Keep soil moist but never soggy. Thin seedlings to one per cell once they have two sets of leaves. Water from below if possible to prevent damping off.
💡 Pro Tip: Brush your hand gently over the seedlings once a day, or set a small fan to blow lightly. The University of Minnesota Extension recommends this for developing stronger stems and reducing fungal disease risk indoors.
Picture this scenario: after following these steps, you wake up one morning to spot dozens of sturdy little tomato seedlings reaching for the grow light—leaves perky, not flopped over. Your neighbor, meanwhile, skips the gentle misting and crowd thins much too late. Their plants? Leggy, pale and doomed to shock in the garden. The details truly matter when it comes to starting seeds strong.
And this is exactly where most people make the most common mistake…
How To Transplant Young Tomato Plants Outdoors Safely
Moving your tomato seedlings from cozy indoor pots to the wild reality of your yard? It’s a high-stakes moment — but with the right routine, you’ll dodge transplant shock and set your plants up for months of healthy growth. Wondering about the safest way to get these delicate starts into the ground?
- You’ll need: Hardened-off tomato seedlings, nutrient-rich compost, a hand trowel, watering can, mulch, and organic tomato fertilizer.
- Start Hardening Off: About 7–10 days before transplanting, bring seedlings outdoors for an hour, then gradually increase exposure time each day. Shield them from wind and direct midday sun at first.
- Pick the Right Day: Wait until nighttime temperatures are consistently above 50°F (10°C) and all danger of frost has passed. The National Weather Service and your local extension office can help you track the date.
- Prep the Soil: Loosen the bed 12 inches deep. Work in lots of compost — tomatoes are heavy feeders. Aim for a pH between 6.2 and 6.8 for best nutrient uptake.
- Plant Deeply: Bury the tomato stem up to the first set of leaves. That buried stem will shoot new roots, making your plant stronger from the start.
- Water Gently: Use lukewarm water to settle soil around roots. Avoid splashing leaves, which can spread disease.
- Mulch and Support: Add straw or leaf mulch around the base, then install cages or stakes so stems stay upright as they grow tall.
💡 Pro Tip: Transplant on an overcast day or in late afternoon to minimize heat stress. This gives roots a gentle transition into their new environment, as advised by the University of Georgia Extension.
In practice: imagine carrying your carefully raised tomato seedlings outside for the first time. The sky’s gray, the air mild — you tuck them deep into compost-rich soil, water just enough, and watch as they perk up by morning. A neighbor, in a rush, plants during a midday heatwave—by sunset, their seedlings are slumped and stunted. Patience and process matter more than expensive gadgets or shortcuts.
But what actually works for surviving outdoors is only half the story…
Common Problems And How To Fix Seedling Setbacks
What do you do when your promising tomato seedlings suddenly flop, spot, or just seem stuck in time? The truth is, setbacks are practically guaranteed for even the most diligent gardeners. But understanding common issues — and how to fix them quickly — is what really makes the difference.
| Problem | What It Looks Like | Quick Fix |
|---|---|---|
| Leggy Stems | Seedlings stretch tall, look pale and weak | Increase light intensity; lower lights closer to the plants; rotate trays daily |
| Damping Off | Stems pinch, fall over; seedling collapses suddenly | Remove affected plants, increase airflow, use only sterile seed starting mix |
| Yellow Leaves | Lower leaves turn yellow or pale | Check watering habits; ensure trays drain well; use diluted liquid fertilizer (fish emulsion or seaweed is great) |
⚠️ Important Warning: Overwatering is the #1 reason seedlings fail. Always check for excess moisture below the soil surface before you ever add more water.
- Pale, slow-growing seedlings? Warm the growing area to 70–75°F and increase hours of light. Cool spaces can really slow things down.
- Brown spots or fuzzy mold? Improve ventilation with a small fan on low, and avoid splashing water on leaves.
- Roots circling at the bottom? Transplant seedlings into larger containers before they become root-bound — usually after 3-4 true leaves develop.
Picture this scenario: you notice tiny white fuzz at the base of your best seedling. Instead of panicking, you gently remove the cover, thin the tray, and point a fan right at the trouble spot. By next week, your tomatoes are back on track while your friend’s tray — left humid and crowded — is down to just a single survivor.
Small steps, repeated consistently, make the biggest difference over time.
Your Tomatoes Will Thank You
If you take just one thing from this guide, let it be: matching the right seeds, soil, and process to your climate gives your tomatoes the best start possible. Remember, how to grow tomatoes from seeds is all about smart preparation, gentle care, and fixing problems quickly—anyone can do it with a little know-how.
Back then, you may have worried about spindly plants or dreaded seedling setbacks. But now? You’re set to grow strong, healthy tomatoes from scratch—confident and in control, from the first seed to transplanting outdoors. Every step you take builds real results you can taste.
What part of starting tomatoes from seed seems the most challenging, or maybe the most exciting, for you right now? Share your thoughts and experience below—let’s help each other grow better!

Ryan James Mitchell is a passionate gardener and plant care enthusiast dedicated to helping everyday people grow food, keep their plants thriving, and connect with nature — one garden at a time. With years of hands-on experience in vegetable gardening, indoor plant care, and seasonal garden planning, Ryan built 3sols to be the practical, honest gardening resource he always wished existed.