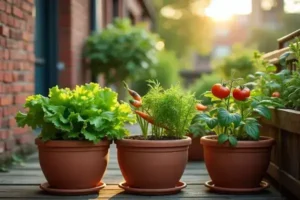
Imagine stepping outside and seeing tidy wooden beds overflowing with fresh greens, tomatoes, and herbs—right in your own backyard. For many, that vision feels just out of reach, tangled in confusion about where to start. Ever stood at the lumber aisle, wishing someone would just hand you a simple, clear plan?
The frustration is real. Trying to piece together advice from a hundred sources can turn excitement into overwhelm. You waste money on the wrong soil, your plants get cramped, and soon that dream turns into weeds—and lost weekends. Worse yet, you keep thinking, “Maybe I just don’t have the knack for this.”
Here’s the thing: by the end, you’ll have a practical system to build, plant, and manage your own raised beds—plus a handy raised bed garden guide printable for planning and tracking. Stick around, because you might just surprise yourself with what you can grow—starting right now.
Why Raised Bed Gardening Makes a Difference
So why do experienced gardeners rave about raised beds? It’s not just about following a trend — there are serious, game-changing advantages hiding in those tidy wooden frames. If you’ve ever battled soggy soil, relentless weeds, or a patchy, stubborn lawn, raised beds can turn your garden headaches into real produce.
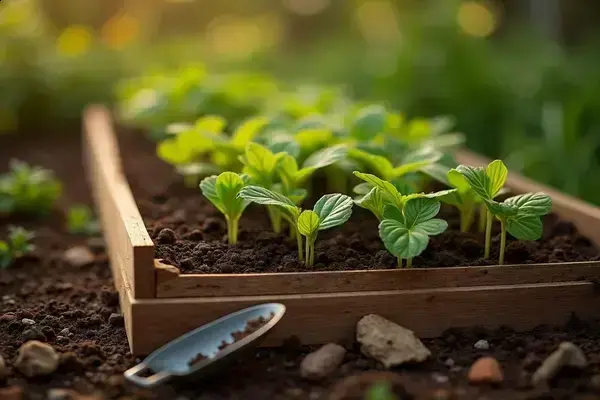
Let’s start with one fact: elevated beds warm up earlier in the spring and drain better than in-ground plots. That means faster seed germination, healthier root growth, and fewer drowned seedlings after heavy rain. The result? You can get greens and veggies on your plate weeks before your neighbors.
💡 Pro Tip: According to the University of California Agriculture and Natural Resources, adding 10–12 inches of high-quality compost-rich soil to your raised bed dramatically improves aeration and moisture control, reducing the risk of plant disease from soggy ground.
Weed control is another huge win. Because you fill a raised bed with clean, weed-free soil, those backbreaking afternoons spent pulling dandelions and grass become rare. You won’t have to till as much, either — and honestly, who wants more chores?
| Raised Beds | Traditional Ground Beds | Impact on Yield |
|---|---|---|
| Improved drainage | Can become waterlogged | Seeds rot less, higher harvest rates |
| Custom soil mix | Stuck with native soil | Healthier roots, fewer nutrients lost |
| Less weeding needed | Weeds invade more easily | More time for planting & harvesting |
In practice: imagine planting lettuce in two places — one, a raised bed with fluffy compost, and the other, a patch of tired backyard earth. By July, the raised bed lettuce is lush and ready to pick, while the ground plot struggles. That’s not luck; it’s the power of controlled conditions.
And here’s what most new gardeners miss: you don’t need much space to see these benefits. Raised beds work in big yards, tight patios, even driveways if they get enough sun. But there’s one detail most owners completely overlook until it’s too late…
Choosing the Best Materials and Location for Your Beds
Picking the right materials and finding the perfect home for your raised beds can make all the difference between a thriving plot and one that fizzles out. But how do you know which choices are smartest for your yard — or your budget?
Let’s break it down: for frame materials, you’ll typically see options like cedar, pressure-treated pine (rated safe for gardening), and composite lumber. Each brings pros, cons, and price points to the table. Cedar resists rot naturally, lasting up to 15 years. Pine is affordable but may only survive 5–7 seasons, even with careful maintenance. Composite boards (like those made from recycled wood and plastic) offer remarkable durability and won’t warp, but they tend to cost more upfront.
| Material | Lifespan | Key Features |
|---|---|---|
| Cedar | 10–15 years | Rot-resistant, natural aroma, mid-high cost |
| Pressure-Treated Pine | 5–7 years | Budget-friendly, treated for decay resistance, must be rated safe for gardens |
| Composite Lumber | 15+ years | Low maintenance, eco-friendly, high upfront cost |
⚠️ Important Warning: Always check the safety rating of any treated wood. Only use wood labeled safe for vegetable gardens (like ACQ-treated lumber). The US Department of Agriculture recommends consulting local guidelines for wood safety, especially for food-growing beds.
As for location, the ideal spot checks three boxes: at least six hours of direct sunlight, easy water access, and good drainage. Avoid placing your beds near large tree roots or in low-lying areas that collect runoff after rain.
- Sunlight: South-facing yards or patios work best
- Water: Proximity to a hose or spigot is a must
- Drainage: Slight slope is better than a flat or sunken spot
In practice: imagine hauling wheelbarrows of premium soil across your yard, only to discover midseason that your bed sits in shade all afternoon or floods after every rainstorm. A little surveying saves a whole season’s frustration.
And what actually works might surprise you…
Building Your Raised Bed: Tools, Tips, and Shortcuts
What if you could skip the frustration and build a sturdy, great-looking raised bed—even on your first try? With a clear plan and a few smart tricks, you’ll be out planting (not cursing at crooked boards) in no time.
- Untreated cedar boards or composite planks
- Galvanized deck screws
- Power drill/driver
- Carpenter’s square and measuring tape
- Level
- Landscape fabric (optional for weed control)
Here’s the truth: most beds can be fully assembled in under two hours if you’ve gathered everything ahead of time. The University of Minnesota Extension recommends a minimum height of 10–12 inches for most veggies, but you can go higher for deeper-rooted crops like carrots or parsnips.
- Measure and Mark: Outline your bed size on the ground with stakes and string.
- Pre-Drill Boards: Drill pilot holes in corners to prevent wood from splitting.
- Assemble the Frame: Use a carpenter’s square to keep corners at perfect 90° angles. Attach boards with galvanized screws.
- Level the Frame: Rest the assembled box on the ground and use a level to adjust each corner. Shim with soil if needed.
- Add Landscape Fabric (Optional): Lay weed barrier in the bottom if you’re worried about grass or perennial weeds poking through.
- Fill with Soil Mix: Combine compost, vermiculite, and quality topsoil for robust, balanced beds.
💡 Pro Tip: Clamp two boards together before screwing—the whole frame lines up easier, and you end up with sharper corners and a sturdier box.
In practice: picture this scenario—Jenna, a first-timer, built her first bed solo in one afternoon, skipped clamping, and found her corners ‘just a little off’ after filling. By her second build, with clamps and a level, the whole install looked pro—and lasted years longer. Smart shortcuts don’t just save time; they prevent those hard-to-fix rookie mistakes.
And this is exactly where most people make the most common mistake…
Planting and Spacing for Maximum Growth
Is there a secret recipe to getting bushier tomatoes, plumper carrots, or greens that don’t crowd out each other? It comes down to understanding plant spacing and timing—two details that matter just as much as your soil mix.
Let’s start with spacing. Raised beds let you use the Square Foot Gardening method, a strategy promoted by the Square Foot Gardening Foundation, where crops are organized by their mature size rather than long rows. That means less wasted space and fewer weeds. Tomatoes? They need 18–24 inches between plants. Carrots? Just 3 inches is plenty. If you cram seeds together, you’re setting yourself up for poor airflow, which breeds fungal disease and reduces your harvest—fast.
💡 Pro Tip: Overplanting? It’s tempting, especially with tiny seeds. Thin seedlings once they sprout and only leave the healthiest in each space. According to The National Gardening Association, consistent thinning boosts both size and yield across most vegetables.
- Lettuce: 6–8 inches apart
- Peppers: 12–18 inches apart
- Basil: 8–10 inches apart
- Radishes: 2–3 inches apart
- Marigolds (for pest control): 10–12 inches apart
It’s not just about elbow room—a properly spaced bed stays healthier. Water and fertilizer reach every root, light filters through the canopy, and you spend less time fighting outbreaks.
Planting Schedule by Crop Type
| Crop | Planting Time | Spacing |
|---|---|---|
| Lettuce | Early spring, fall | 6–8 in |
| Carrot | Late spring | 3 in |
| Tomato (Transplant) | After frost | 18–24 in |
| Basil | After soil warms | 8–10 in |
| Peppers | After frost | 12–18 in |
In practice: picture this scenario—a new gardener plants a row of bush beans just a hand’s width apart, thinking it’ll mean more beans at harvest. By July, the leaves are yellowing from lack of airflow, and the flowers are slow. Next bed over, carefully spaced beans look lush and double the yield. Efficient spacing truly pays off.
But there’s one little resource that separates solid planning from next-level productivity…
Printable Planner and Checklist to Keep Your Garden Thriving
Ever wished you had a foolproof way to stay organized through the chaos of seed-starting, bed-tending, and harvest season? That’s where a printable raised bed garden planner earns its keep—it’s honestly the secret weapon used by many productive home gardeners to turn sprawling ambitions into tangible results.
This planner gives you ready-to-print templates for mapping every square foot, tracking crop rotations, scheduling when to plant and harvest, and not forgetting essential tasks like fertilizing or thinning seedlings. Most checklists include columns for planting dates, expected germination, watering frequency, pest notes, and amendments used—so everything’s at your fingertips.
💡 Pro Tip: Keep your planner in a weatherproof binder stored near your garden shed for fast daily updates. According to The Old Farmer’s Almanac, tracking your beds season after season is the single best way to improve yield and spot pest patterns before they cause real damage.
- What to fill in: Crop types, planting location, planned tasks, harvest goals
- How often to update: After every major gardening session—planting, pruning, watering, or harvesting
- Best place to keep it: In your shed or in a zip-top bag inside a garden tote (dry, shaded, and always handy)
In practice: picture this scenario—Nicole prints her checklist at the start of spring and logs carrot and bean planting dates, weekly watering, and a random heatwave. Fast-forward to next year: she flips back, sees exactly what worked, and adjusts her schedule for an even better harvest. Suddenly, progress feels visible and rewarding—no more guessing games.
The right habits in place now make everything easier from here.
Your Garden Is Ready to Grow
From picking the right bed materials to mapping your layout, you now hold the keys to a productive, hassle-free garden. If you take just one thing from this raised bed garden guide printable, let it be this: thoughtful planning and simple tracking always beat guesswork in the long run.
Maybe raised beds felt overwhelming before. Maybe you never knew if you were planting, spacing, or recording things the “right” way. But today, you’ve got the know-how and a planner to prove it. That next harvest? It’s already looking brighter and easier. Really—anyone can do this.
Which printable checklist, spacing tip, or shortcut do you think will help your garden most right now? Tell us below—you just might spark a new idea for someone else, too!

Ryan James Mitchell is a passionate gardener and plant care enthusiast dedicated to helping everyday people grow food, keep their plants thriving, and connect with nature — one garden at a time. With years of hands-on experience in vegetable gardening, indoor plant care, and seasonal garden planning, Ryan built 3sols to be the practical, honest gardening resource he always wished existed.